Gravel bike suspension forks are still in the early days.

Embedded from bikerumor.com
If you want front suspension on a gravel bike, your choices are limited.
The best you can do is fit a (weighty) limited-travel twin stanchion mtb fork, with its coil spring shock absorber on one side and fluid damper on the other, such as offered by Fox (AX) and SR Suntour (GVX).
The best suspension solution, though, is a ‘headshok’-type as it were, not a traditional—weighty—twin stanchion mtb fork, with a coil spring on one side and fluid damper on the other.
With the demand for e-gravel bikes increasingly exponentially, there is an even more urgent need for a robust, good looking and low maintenance suspension fork.
In this article I sketch out where gravel bike suspension stands now and where gravel bike suspension fork design is heading.
CONTENTS
GRAVEL BIKE SUSPENSION FORKS – What Are the Choices?
E-GRAVEL BIKE (& Suspension Fork)
SCADA’s GRAVEL BIKE SUSPENSION FORK
Key to Fork Longevity
Fork Assembly
Suspension Mechanism
Setting Preload
360° Grease Delivery
Testing Procedure
GRAVEL BIKE SUSPENSION FORKS — CHOICES
The only choice for going off-road once was a mountain bike.
If you still ride rough country or are into downhill, then you’d ride an MTB with the standard suspension forks (and probably rear suspension).
Gravel bikes, however, have opened up a much wider range of terrain to all cyclists.
A cyclist can pursue classic road biking on good surfaces and also as choose to traverse unsealed, rougher roads and tracks not suitable for road bikes, all in the one cycling session.
Can you go without suspension? Certainly. You’ll be watching carefully for—and avoiding—the deeper ruts with their sharper impacts though.
That leaves the choice of standard mountain bike forks. Or forks with a single shock mechanism built around the steerer which fits into the head tube.
Lauf Grit Fork
The Gravel Cyclist has reviewed this unique carbon alternative to the twin stanchions or single head tube-installed shock absorbing solutions.

The Lauf Grit is a creative response to the need to provide a (carbon) suspension fork exclusively for gravel bikes, although it’s not the most elegant solution by a long way.
The Gravel Cyclist observes that the Lauf Grit smooths out his ride by eliminating the “fine bumps” whilst still transmitting most of the shock from the bigger pothole impacts.
Control of the bike is maintained which is the most important consideration he remarks.
In the end, though, he goes for no suspension at all—the original, lighter, rigid fork in conjunction with lower tire pressure is the optimal setup for him.
In the next section, I’ll detail SCADA’s unique contribution to gravel bike suspension fork design, which combines good looks with functional performance.
E-GRAVEL BIKE (and SUSPENSION FORK)

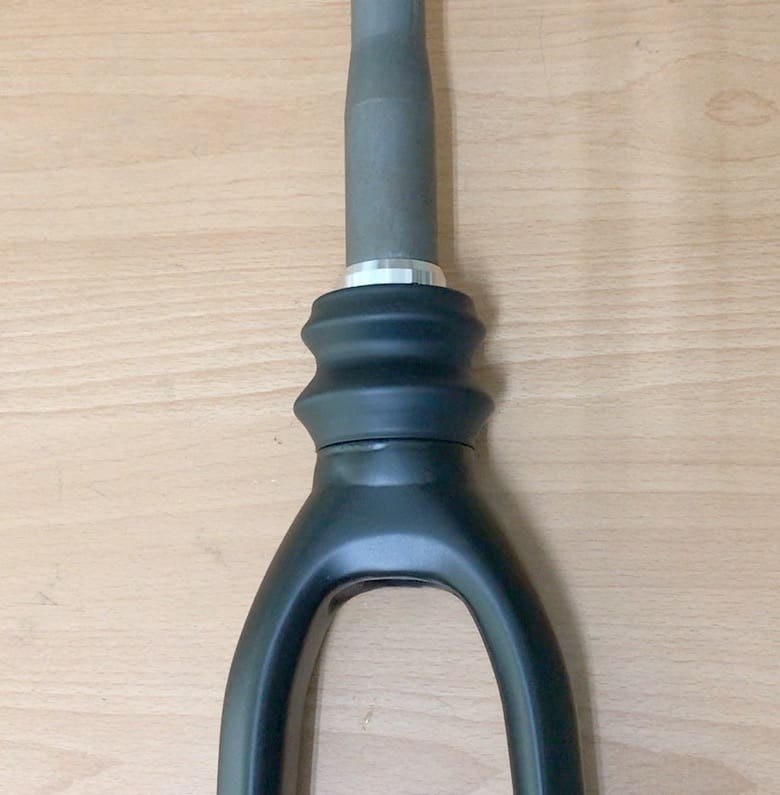
I’ll use this gravel bike, Eimark’s FLR Eight fitted with SCADA’s suspension fork as an example.
The Eimark ebike brand was established in 2020 to introduce an affordable e-gravel bike for Taiwan enthusiasts in anticipation of future growth in ebikes and the e-gravel bike segment in particular.
This FLR Eight is fitted with a riser bar rather than standard drop bars, providing a more relaxed ride over roads that while not friendly to road bikes, certainly don’t require a mountain bike.

The Bafang M800 mid-drive motor is just right, making available 250 watts of steady assist with a maximum torque of 55 Nm into headwinds on the flat or on hillclimbs.
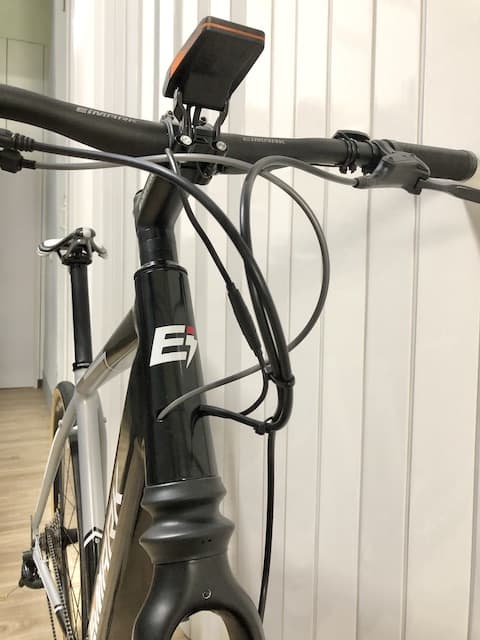
This gravel bike’s suspension fork travel can be adjusted to a maximum of 40 mm.
The suspension can be tightened or loosened by adjusting the top-out mechanism with a 6 mm Allen wrench accessed through the fork arch.
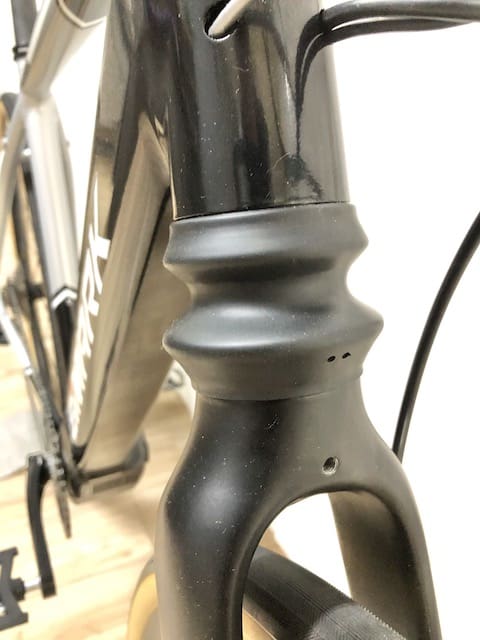
SCADA’s GRAVEL BIKE SUSPENSION FORK
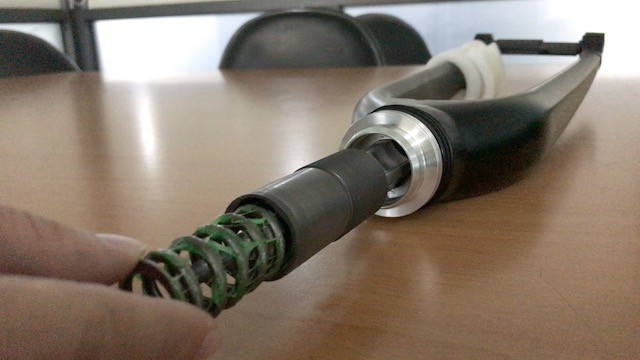
In this section I’ll demo SCADA’s gravel bike fork suspension mechanism assembly procedure, giving you a better idea of how it works.
You’ll certainly note similarities with Cannondale’s Headshok unit.
A key difference, however, is that SCADA’s gravel bike fork does not use a fluid damper; but, of course, it’s not designed to absorb the punishment mountain bike trails mete out.
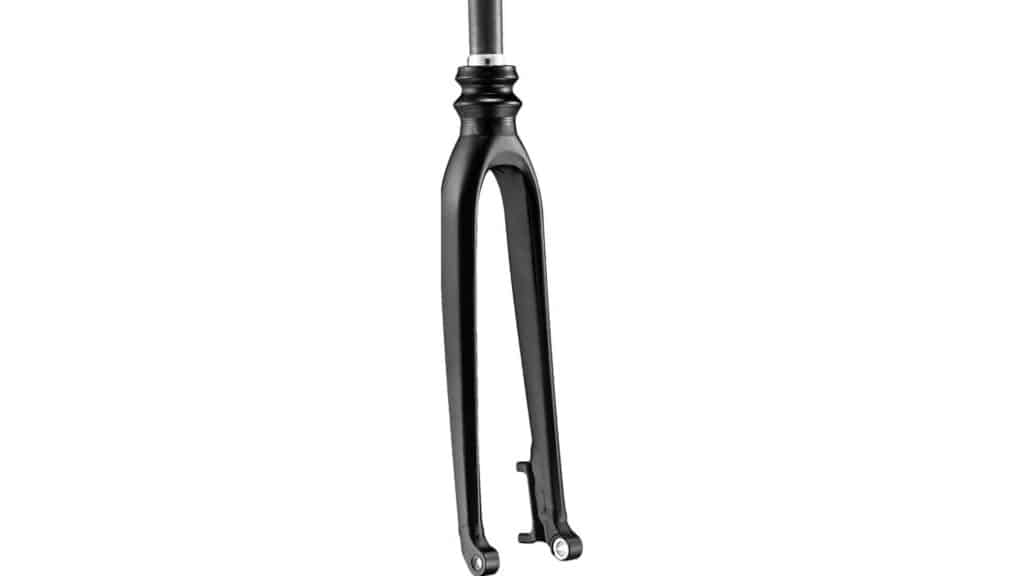
The unit’s limited travel is just right for gravel and trekking in a form that can put the shock absorbing mechanism together with any alloy or chromoly fork/blade design—using an alloy steerer lightens a fork by 275g.
The Keys to Fork Longevity—Tolerances & Easy Maintenance
There are two elements in ensuring suspension fork longevity:
- tight tolerances
- consistent maintenance, particularly keeping parts greased
The engineers brief was to design the suspension mechanism’s components with minimum gaps, since tight tolerances result in minimal play.
And ensuring any play is easily lubricated extends the working life of components well beyond what you might normally expect.
I’ll go into detail about SCADA’s gravel bike suspension fork unique lubrication solution at the end of this section.
GRAVEL BIKE SUSPENSION FORK ASSEMBLY
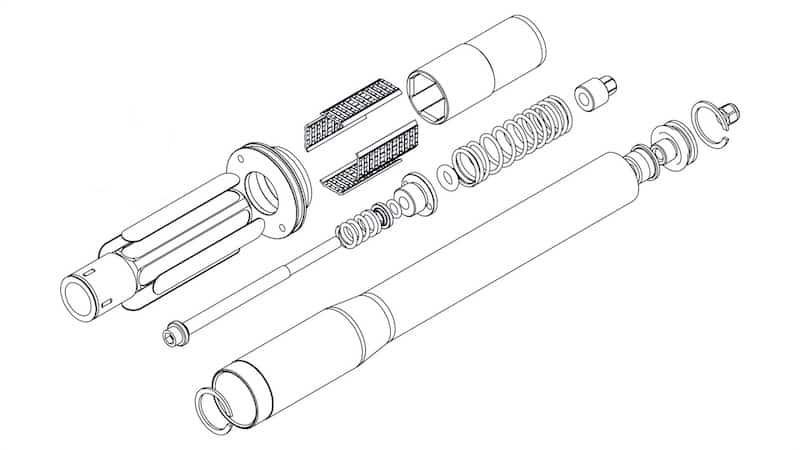
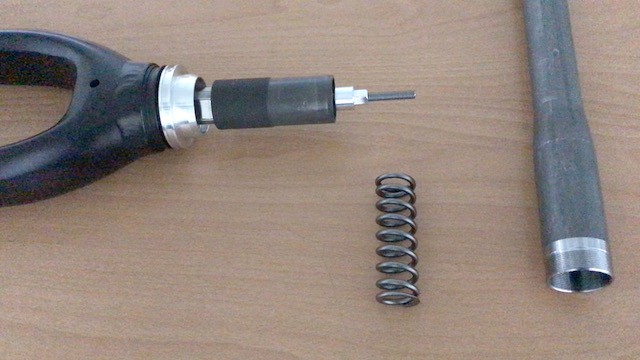
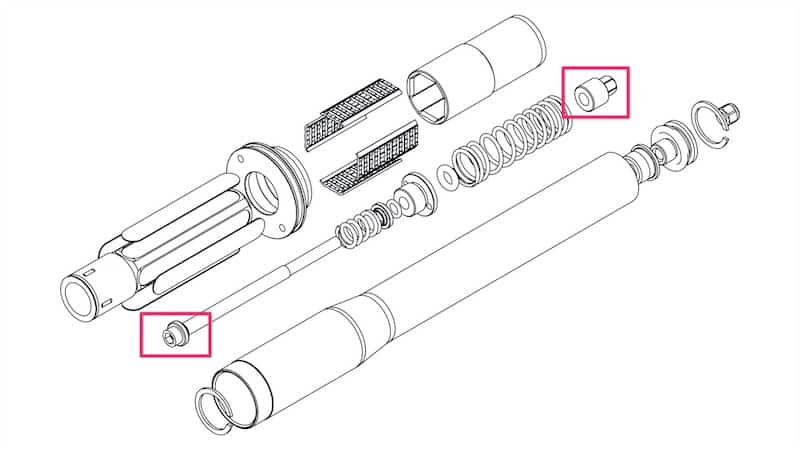
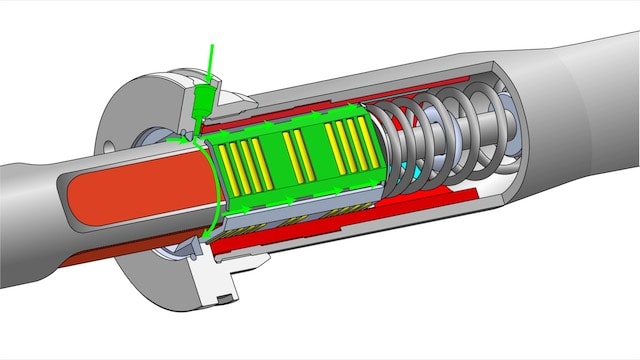
The mechanism in this gravel bike suspension fork consists of three sections.
- Bearing assembly which uses needle bearings.
- Top out spring unit
- Steerer tube with the main spring
Having inserted the bearings, the assembled top out spring is inserted, then the lot is integrated with the main steerer tube.
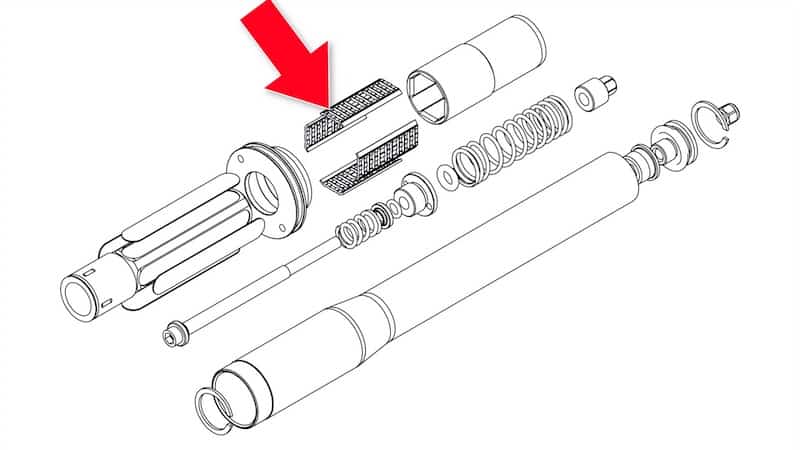
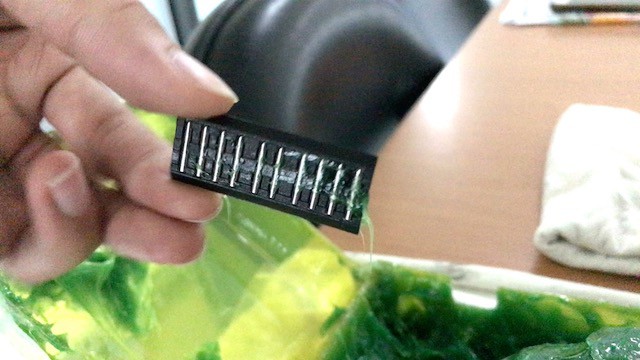
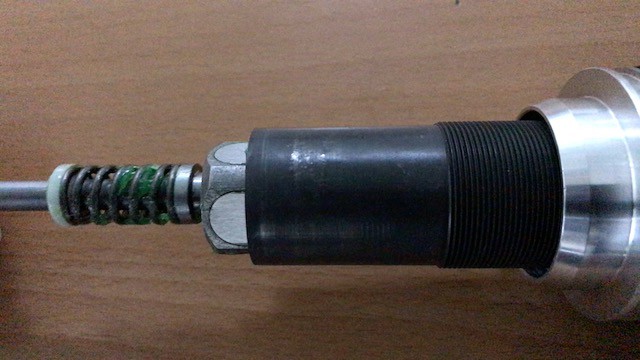
Needle Bearings and Shims
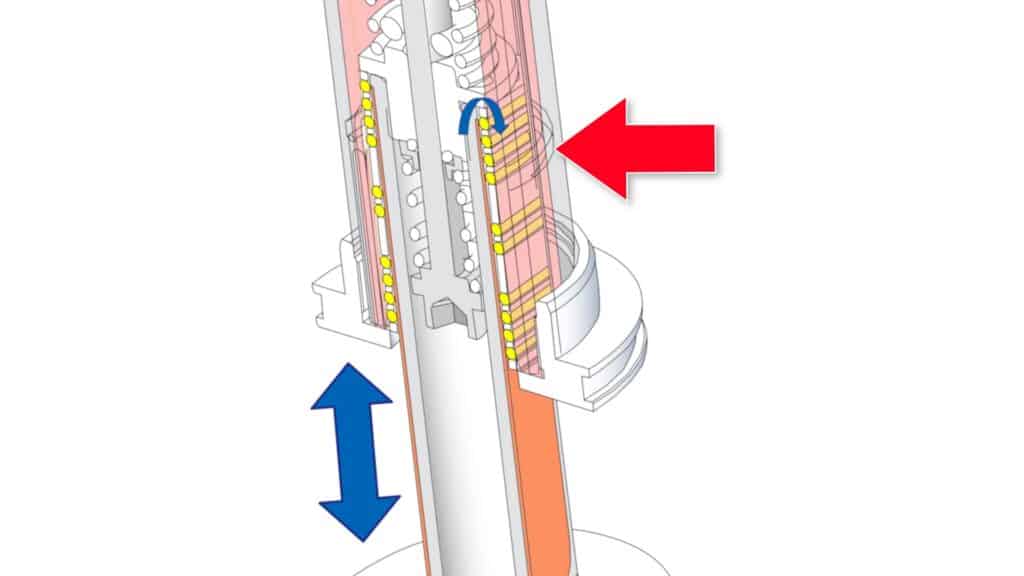
The essential elements of the shock absorbing mechanisms are elongated cylindrical bearings, or needle bearings, that work in conjunction with a central coil spring, mediating the movement of the steerer against the enclosing steerer tube.
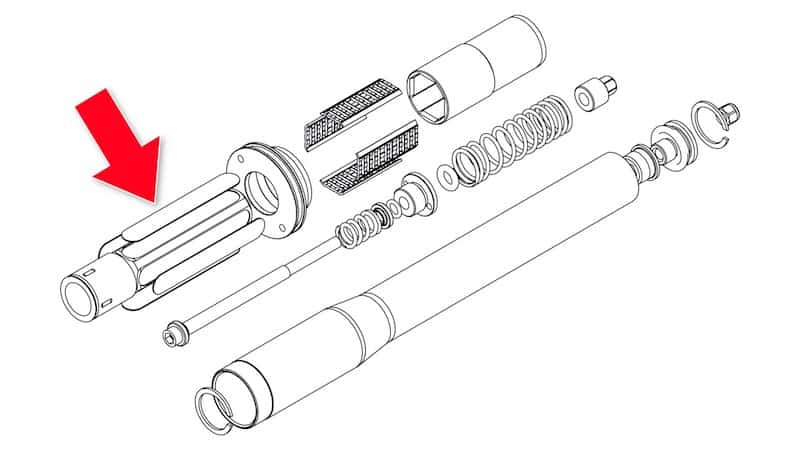
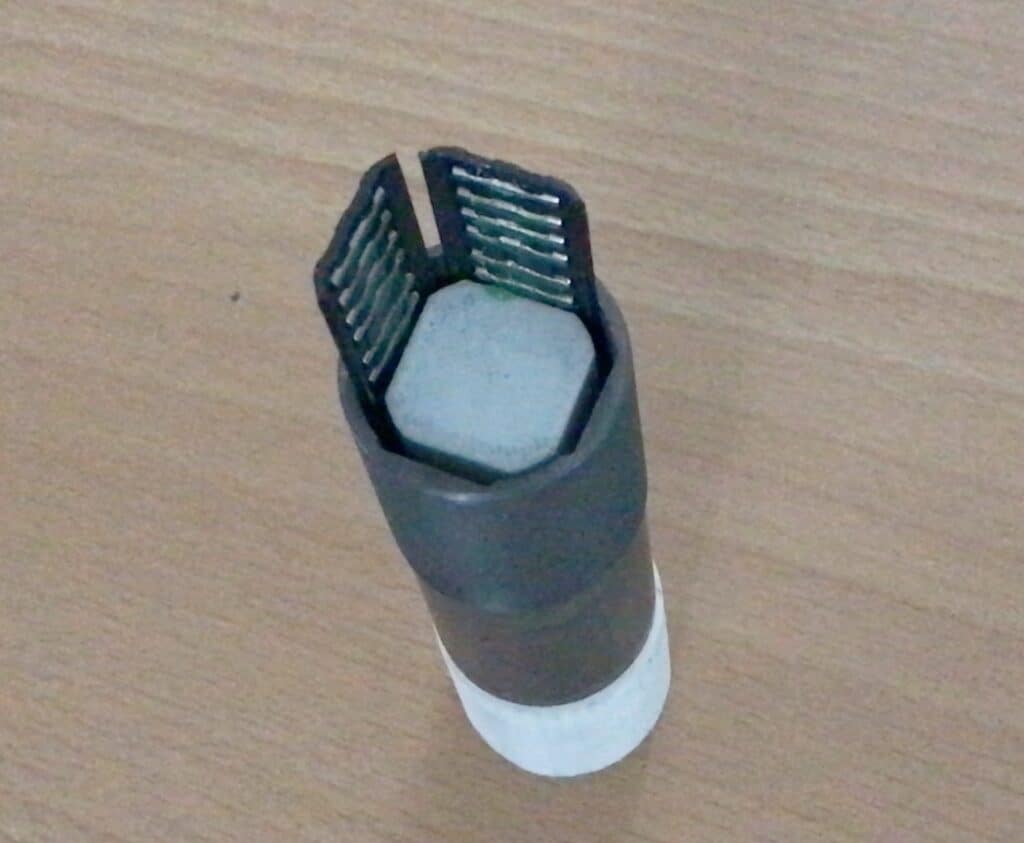
The first part of the assembly requires fitting the shims to the fork steerer.
The needle bearings then fit on top of those within the inner steerer.
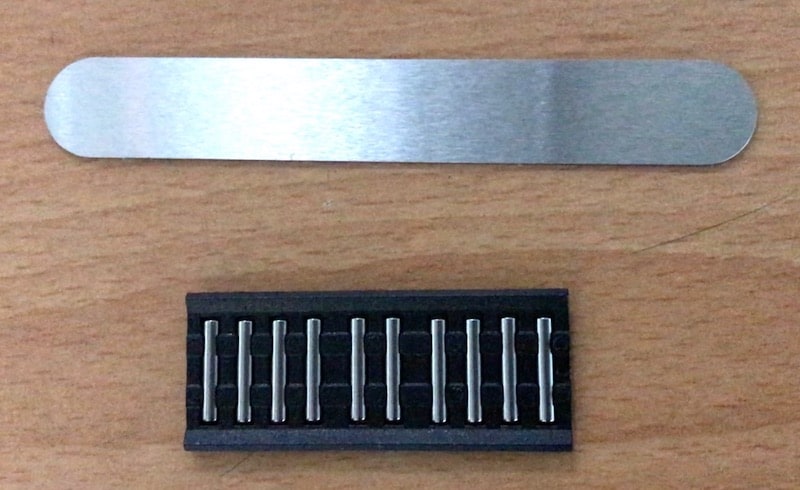
The shim with the needle bearings.
Grease on the fork steerer seat for the shims.
Four shims install on each of the four sides of the fork steerer.
The collar marks the bottom of the assembly and is placed in readiness to lock into the steerer tube once the other components have been assembled.
A coat of grease for the needle bearings which sit firmly in their bed as bearings would in a cage as they do in sealed bearings.
A nylon jig temporarily fitted into this section of the steerer allows us to most easily and accurately seat the bearings.
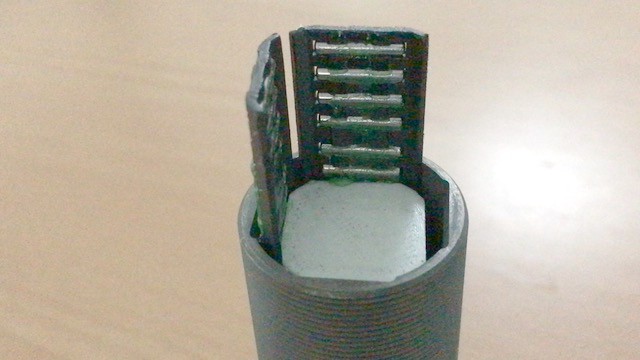
Once the bearings are in position we can remove the jig
We slide the fork tube section up into the collar, then extract the jig.
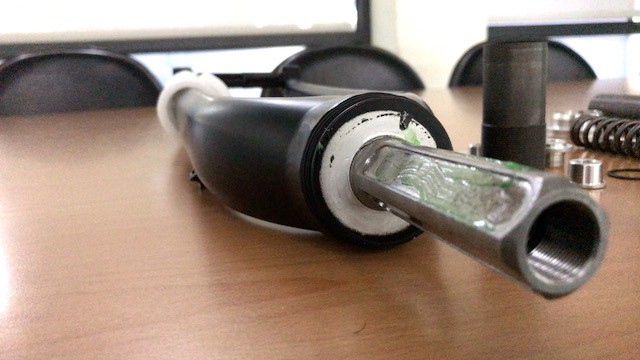
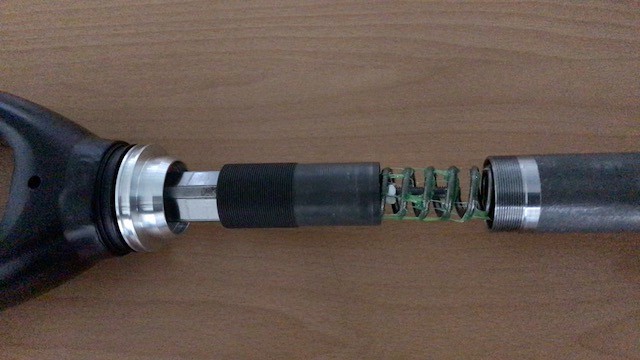
Main Suspension Mechanism
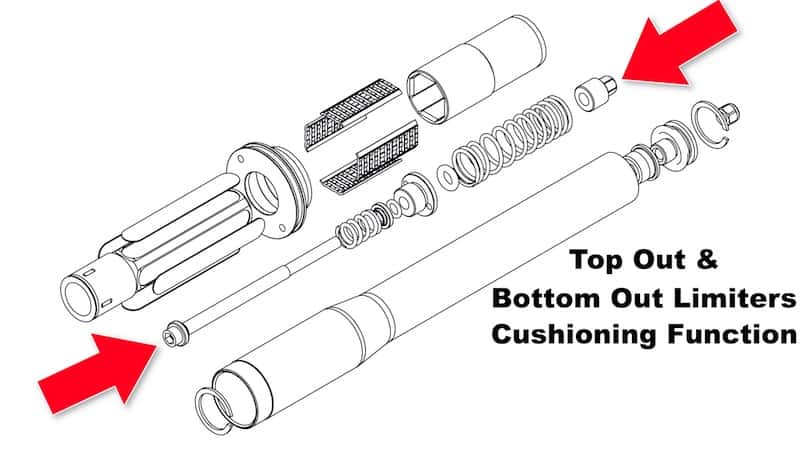
The next component is the main suspension mechanism, which works through the combination of the main coil spring and top-out/bottom-out limiter.
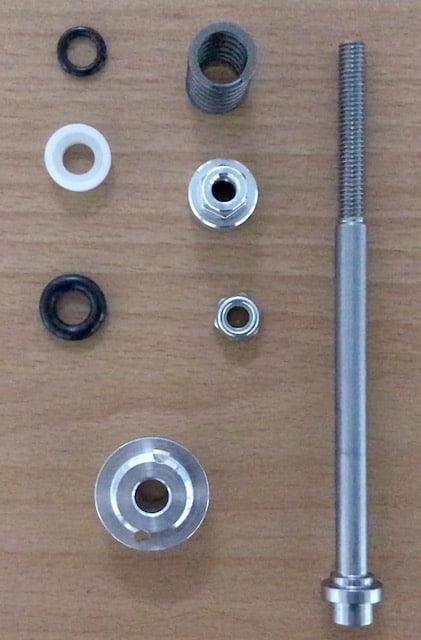
We assemble the o-rings, bushes and nuts into the fully assembled top out limiting unit, then install it into the fork steerer.
This component’s critical function is fine control of suspension stiffness once the fork is in use on a gravel bike.
Tightening the nut at the limit.
Here we see the bearing assembly in place in the lower steerer, ready to accept the top-out limiter.
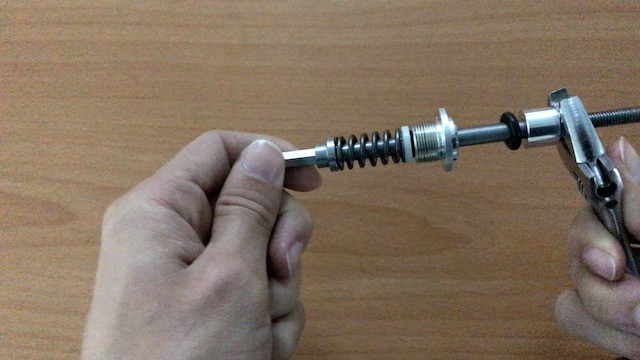
After slathering the spring with a generous coating of grease, the top-out unit slides into place.
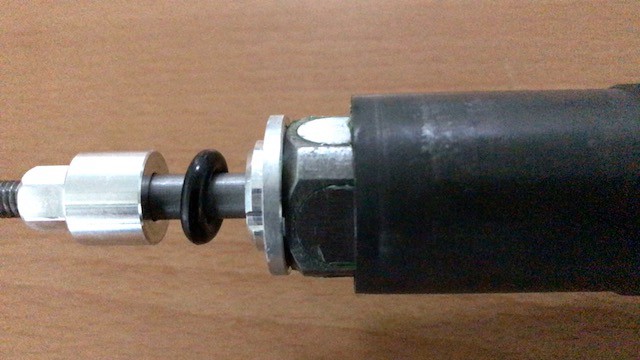
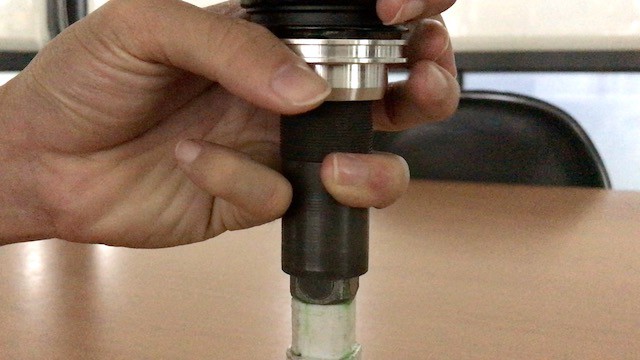
The lock nut threads into the internal steerer; the upper part of the steerer containing the main spring encloses the lot and screws onto the main steerer tube thread (visible on the right).
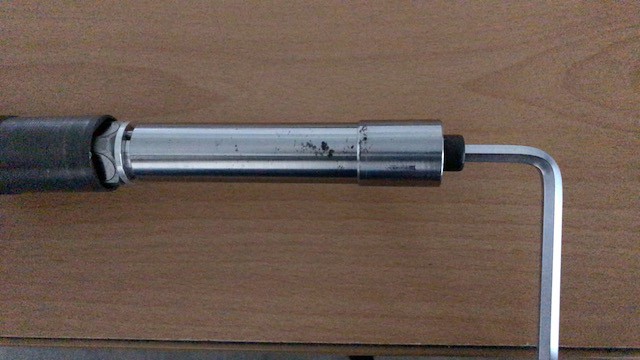
The unit is secured in place with a tubular wrench.
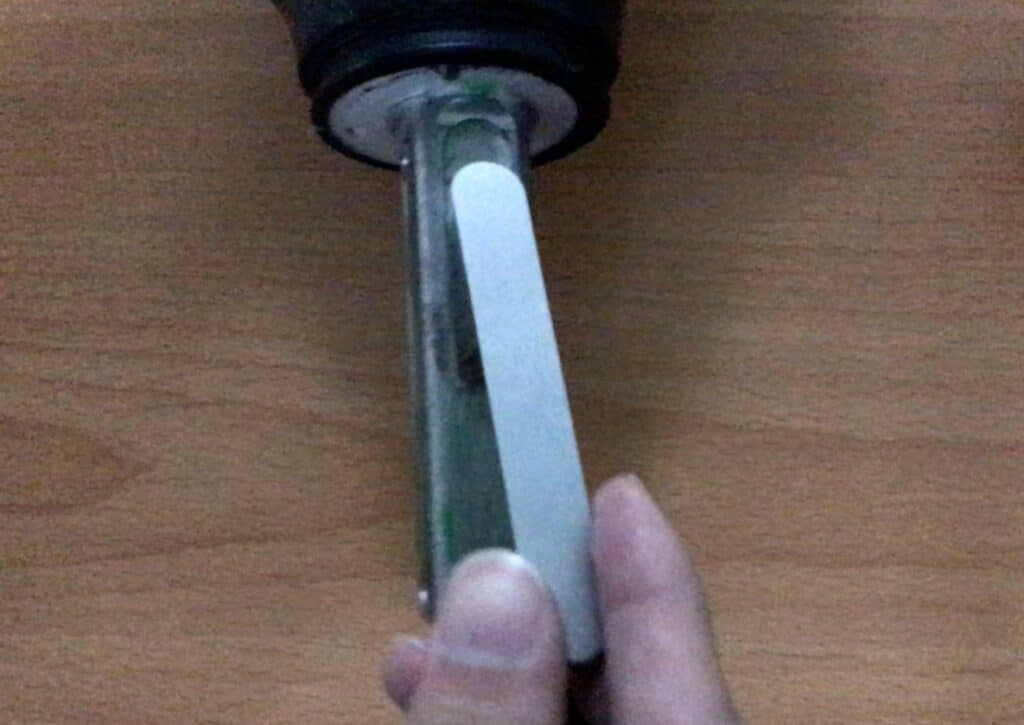
Main Suspension Spring
The remaining tasks are to install the spring, screw the upper steerer tube onto the lower tube, then adjust the pre-load.
After a generous coating of grease, the spring slides in over the top of the top-out unit.
The upper steerer tube fits over the top.
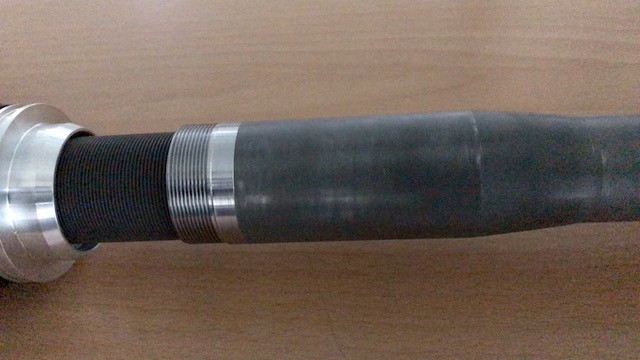
Then screws down into position.
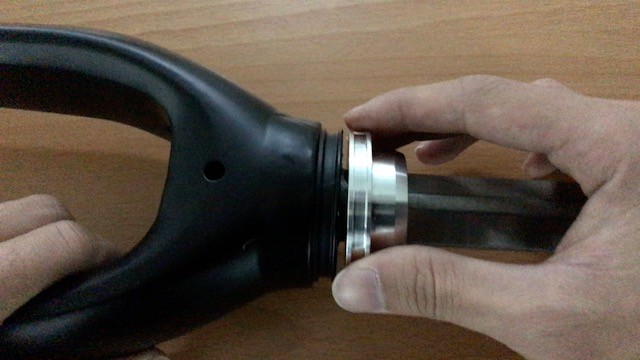
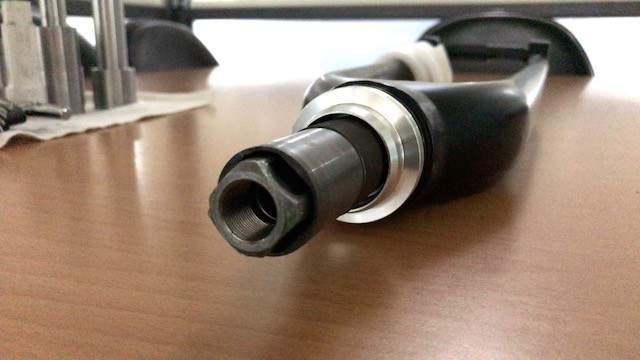
The collar is the last piece in place, locking over the bottom of the steerer tube; it is securely fixed in place by using a two-pin wrench designed just for the task.
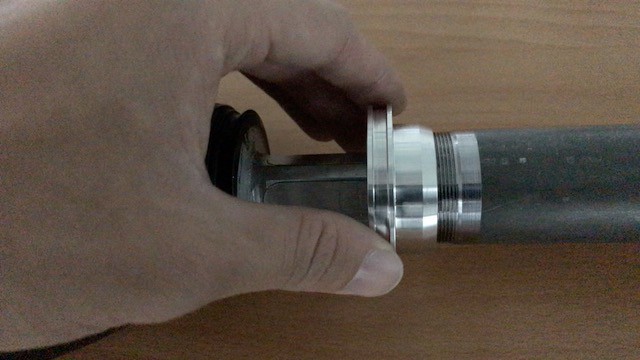
Setting Pre-Load
With the collar locked we can install the pre-load nut allowing a tighter or looser suspension experience depending on rider preference.
We install then tighten this nut into position at the top.
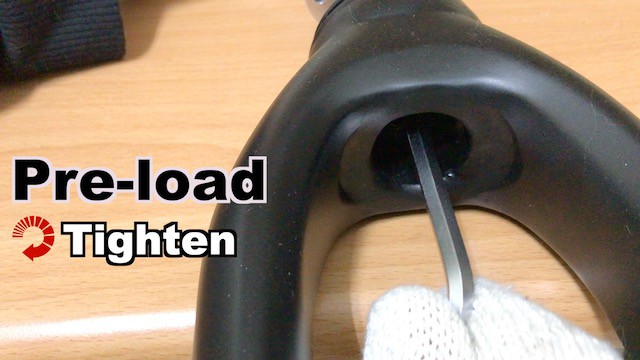
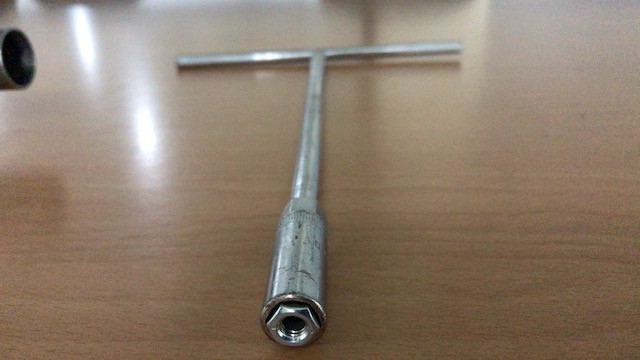
Suspension tightness or looseness is adjustable with a 6 mm Allen wrench.
Clockwise to tighten the spring; counterclockwise to loosen, which has a significant effect on travel.
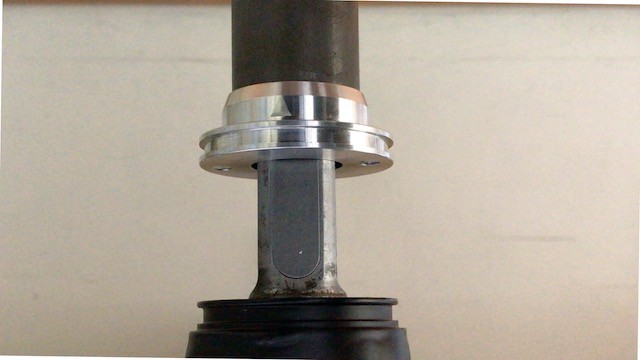
80% compression with the spring tightened almost to the maximum, an appropriate setting for a gravel bike on a moderate surface perhaps.
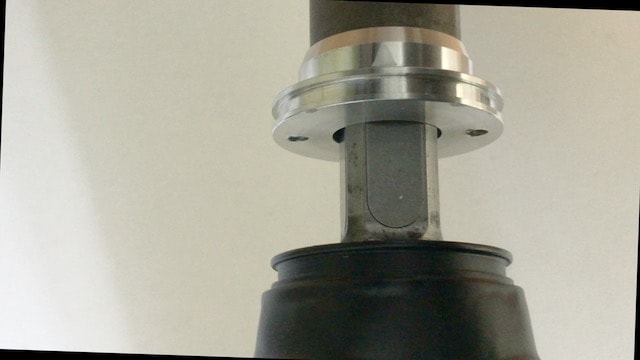
With the spring almost fully relaxed: the travel is greatly increased, a setting good for trekking bikes traversing roads in reasonable condition that only occasionally deal out the hard knocks.
Checkout the procedure in detail in the video of the assembly process.
360° Grease Delivery System
A key consideration when designing the shock mechanism was to make it easy for a user to replenish bearing grease without needing to dis-assemble anything.


The model featured in this article is an earlier version of SCADA’s gravel bike suspension fork, which lacked the grease nipple of the second generation units, enables grease delivery to the bearings, right the way round—no dis-assembly for what should be a routine operation.
Six months is the recommended interval between grease injections.
The rubber dust cover is designed to keep the worst of the dirt and grime from working into the shock absorbing components.
These Gravel Bike Suspension Forks are Severely Tested
Fork testing is demanding, focusing on unrelenting continual stress to evaluate fatigue resistance.
Randomly selected fork samples undergo 500,000 cycles at 500 Nm (newton meters) of pressure.
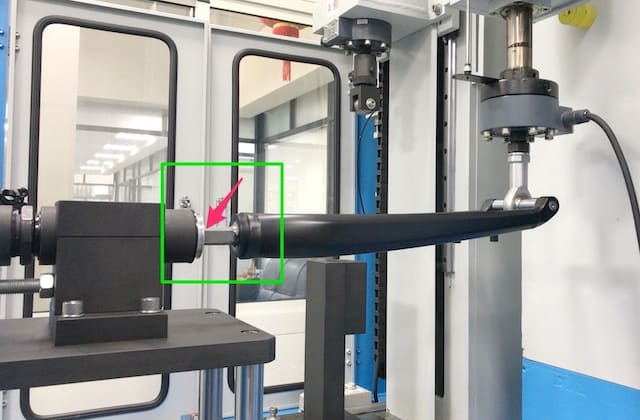
The piston mimics the way a wheel hub introduces stress to a fork at the dropout, focusing it where the steerer enters the tubing.
The strain endured by forks in these tests is more than any would be subject to over a normal lifetime of use.
FINAL REMARKS
From the getgo when setting out to design a gravel bikes suspension fork, we knew that twin stanchions were not the way forward.
A simple, limited travel, easy maintenance shock absorbing system situated around the steerer inside the head tube seemed the best solution.
SCADA’s gravel bike suspension fork is designed to smooth the way on all the routes where mountain bike suspension is overkill but a more comfortable—and controlled—ride is the object.